App architecture
This document contains a description of the architecture of HiCognition, which can be summarized in the following scheme:
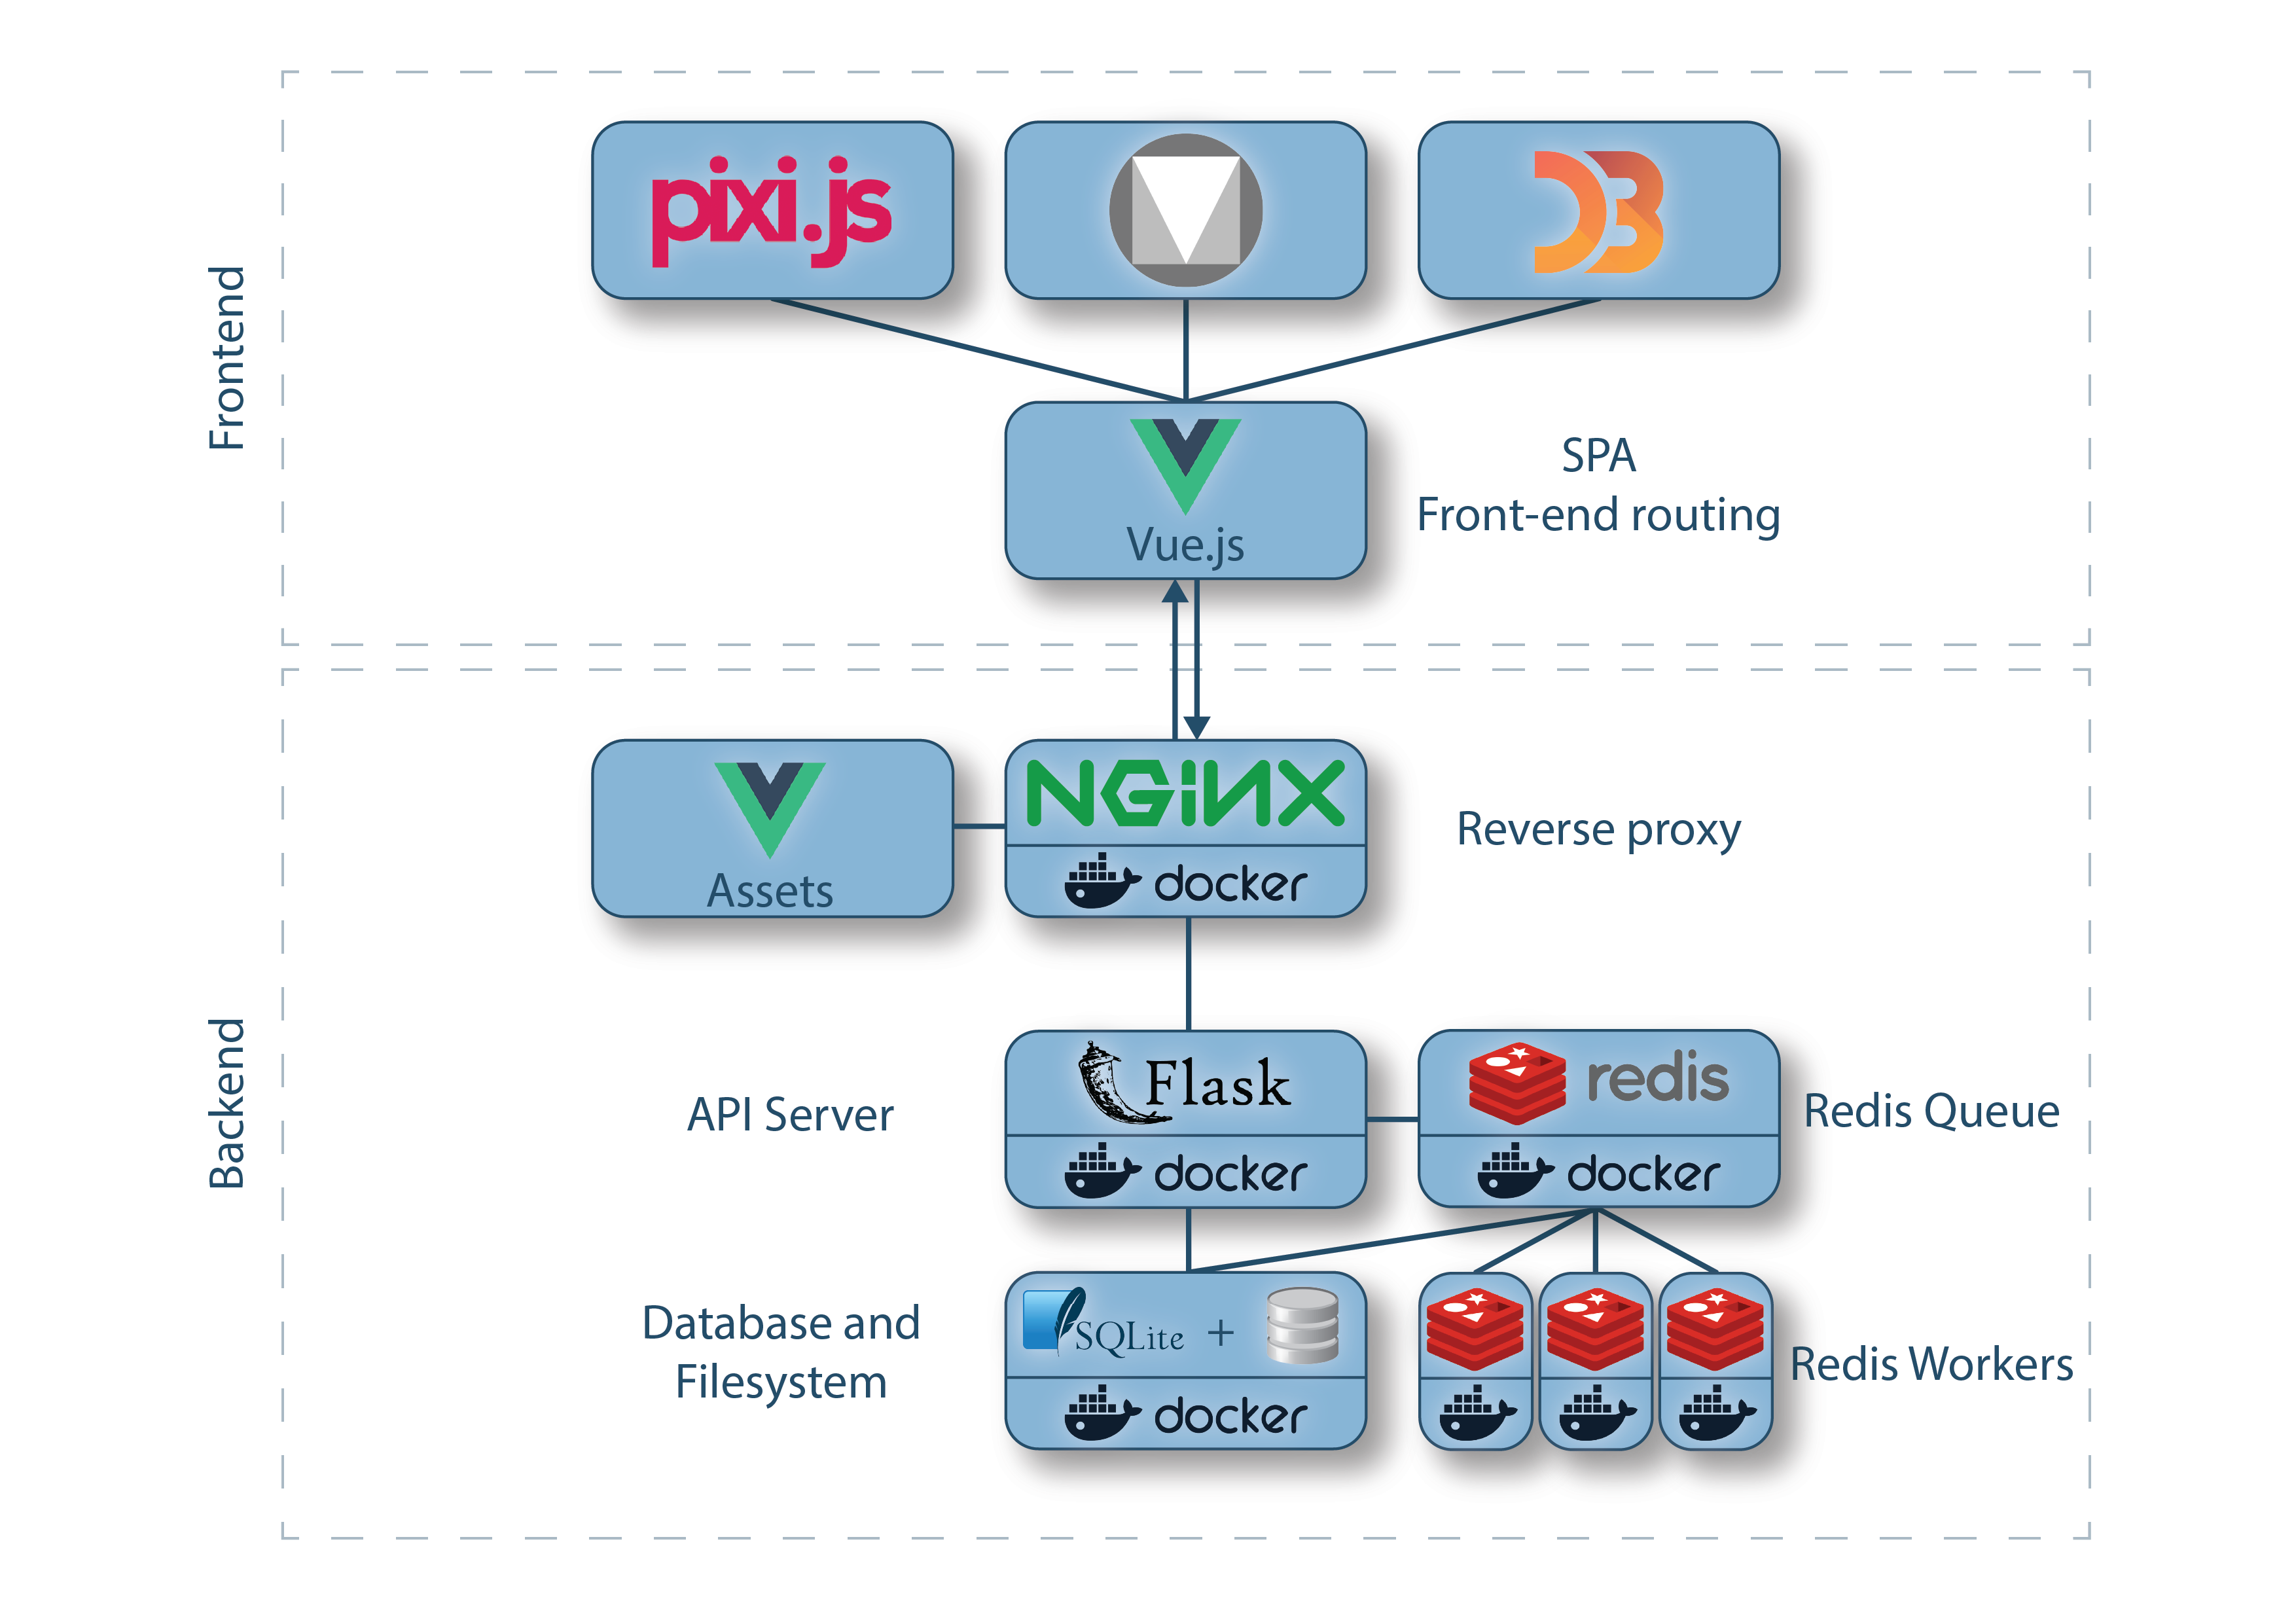
Back-end
Docker network
All the docker containers that work together in the back-end are coordinated by docker-compose (see docker-compose file) and reside within a docker-network called hicognition-net, to facilitate networking between them. The docker containers that are used are the following:
hicognition- Container that harbors the flask-servermysql- contains Mysql databasenginx- contains nginx reverse-proxyredis-server- contains the redis-serverredis-worker- redis-worker container
Additionally, there is a transient container used:
node- Node container that is started to build the front-end files
Flask-server
The core of our back-end is a flask-server that runs in a custom docker container and manages the authorization of users and exchange of data with the Vue.js front-end. This flask-server is a pure REST-API, meaning that it is mostly state-less with regards to the user requests and serves data in JSON format. The API-routes are implemented using the blueprint-pattern to allow modularization and easy extension in the future.
The User-authorization is done either by sending the user credentials (username and password) or via a token that can be obtained from the /tokens/ route. The token is generated using itsdangerous.TimedJSONWebSignatureSerializer and is currently valid for 1h. The /tokens/ route only accepts username/password authorization to prevent malicious actors from obtaining new tokens with an old token indefinitely.
Different configurations of the server are collected in a config.py file that defines classes that carry the configuration options as class variables. These different classes are used in the create_app app-factory function to register the relevant config settings via app.config.from_object(). The relevant config class can be specified via the env-variable FLASK_CONFIG. The different classes are:
DevelopmentConfig- This configuration class is used in the development and specifies that flask should be started in development mode.TestingConfig- This configuration class is used during testing and creates a sqlite database in memory.ProductionConfig- This configuration class is used in production and specifies that the database should be created in the app directory resides in a file.End2EndConfig- This configuration class specifies the configurations for end2end integration testing
The general policy is to provide default values for development but get the values from environment variables in production. This is achieved by using the following pattern for each config-variable: Config = os.environ.get("ENV_VAR") or default. For a detailed description of the configuration variables see the configuration section.
Database
The flask-server and the Redis-queue worker use a common database to record and change information about users and datasets. We use SQLAlchemy as an Object-relational-mapper (ORM) to abstract details of the underlying database. This allows, in principle, to quickly change database back-ends and allows interaction with the database via python classes and functions. Currently, we use MySQL to store meta-information about datasets (file-path, name, etc.) and users directly in the database, and large data (images, raw-files, processed-files, etc.) is stored on the filesystem.
Database migrations are managed using FLASK-Migrate that is a wrapper for alembic, a database migration tool for SQLAlchemy. Using this set-up, database migrations are scheduled using:
flask db migrate -m $MESSAGE
This creates a migration script in the ./migrations sub-folder. This migration can then be applied using flask db upgrade. The ./migrations directory is committed to version control and records the migration history of our database. The development workflow is to define database models in a models.py file and commit a migration to version control. Then, on the production server, the newest changes - including the migration script - are pulled, and the database migrated to the newest version using flask db upgrade.
Interactions with the database are managed by FLASK-SQLAlchemy, which uses a ScopedSession object as db throughout the app, that ensures thread-safety of database interactions.
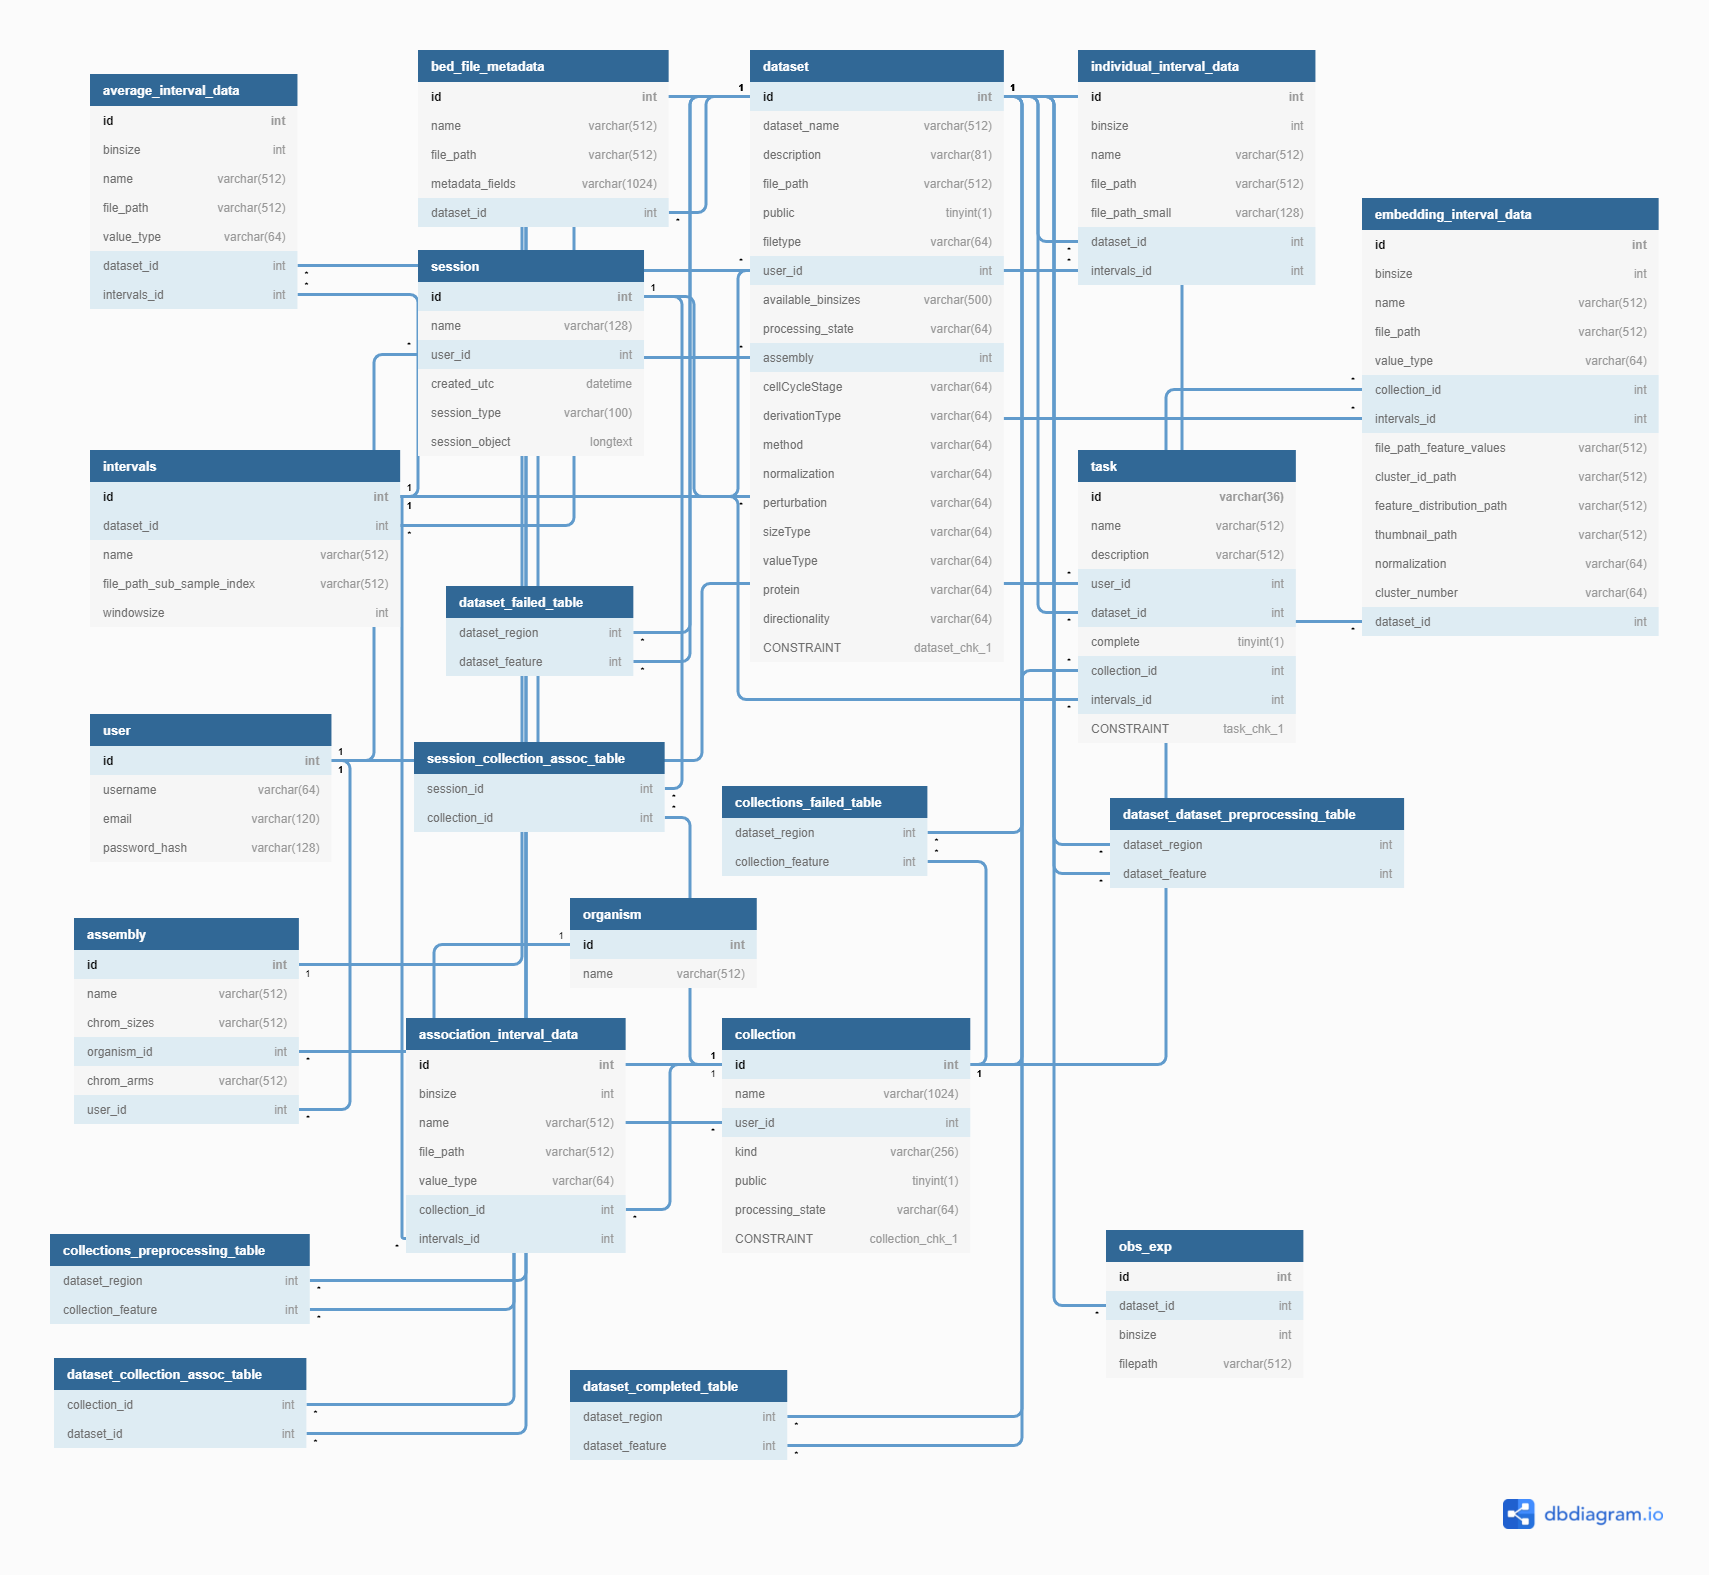
Database model
Details are here, this is an overview drawn using https://dbdiagram.io/home:
Filesystem interactions
The flask-server and the Redis-worker need access to a shared filesystem since all raw and processed datasets are stored as files, with their filenames being recorded in the database.
Queue
Resource heavy and long tasks are offloaded to a redis-queue that consists of a Redis-server and one or more Redis-workers. The Redis-server accepts task items and manages to distribute them to the Redis-workers. The Redis-server runs in a docker container that is derived from redis:6-alpine with a custom config-file. The Redis-workers use the same docker-container as the flask-server as they need access to most modules the server needs.
All tasks that the queue can run are defined in tasks.py.
Tasks are launched using an instance-method of User called User.launch_task that accepts the name of the task, a short description as well as the dataset_id of the dataset being processed. This method enqueues the job and adds the Task table entry to the current database session.
There are three different queues:
- short
- medium
- long
The tasks are distributed to these queues based on the PIPELINE_QUEUES configuration parameter (see the configuration section for more details)
Front-end
We use vue.js in the front-end to manage routing, interactivity and fetching data from the back-end. Here, we employ a template-based design, where each vue-component resides in its own .vue file that is included in the distribution built by webpack.
Build
Front-end files (index.html, app.js, vendor.js, app.css, manifest.js) are built using webpack with configs set in frontend/build/build.js and frontend/build/webpack.prod.conf.js and frontend/build/webpack.dev.conf.js (these both use frontend/build/webpack.base.conf.js).
Babel is first used to transpile js-files to support all browsers with > 1% market share and support the last 2 versions (config settings "browsers": ["> 1%", "last 2 versions", "not ie <= 8"]). Then, js-files are minified and both js- and css-files are included in the generated index.html file and copied to the ./dist directory.
Environment variables for development and production are defined using frontend/config/dev.env.js and frontend/config/prod.env.js, respectively. Variables are:
API_URL- The URL of the flask-APISTATIC_URL- The URL of the static directory.VERSION- The Version of HiCognitionNOTIFICATION_URL- The URL of the notification stream
These variables are accessed in js-files using process.env.VARIABLE and resolved by webpack during the build.
Modules for build are imported using the “import”-syntax rather than the “require”-syntax (more info). This allows webpack to only bundle the actually used parts of a module, making the bundle smaller.
Development server
A webpack development server is started using webpack-dev-server --inline --progress --config build/webpack.dev.conf.js --host 0.0.0.0 with the alias npm run dev. This enables hot-reload, real-time linting and the usage of front-end debugging using the vue-development chrome extension.
Vue set-up
Vue is used to create a single-page application (SPA) in the front end. This requires the usage of several extensions that serve different parts of the app:
- vue-router - This manages front-end routing and enables route-nesting and routing of subsets of the current view
- vuex - Since a vue.js app often consists of multiple components and multiple routes, it is frequently necessary to share data between these parts. Vuex serves the purpose of a front-end database that allows sharing of data.
- vuematerial - Collection of components that facilitate development by encapsulating high-level user interfaces such as cards, buttons, etc.
Vue-router
The specifics of the router are defined in frontend/src/router.js. In general, there are two main views called /login and /main. /login defines the loginRoute component that has a different toolbar to the /main view components. /main is where the app resides, and it contains one sub-route: /main/compare.
The /login route defines a form that sends the user credentials to the /api/token/ back-end route to obtain a token that is valid for 24 h.
All routes that are children of /main require authentication. Authentication is checked by verifying that a token resides in the main vuex store. If no token is found, the user is redirected to /login.
Note that this routing step does not check the validity of the token. Validity is only checked when data is retrieved from the back-end.
Vuex-Store
Data that needs to be shared among multiple front-end components is stored in a vuex-store. This store is defined in frontend/src/store.js. There is a global store that stores data that needs to be accessible across the entire app (such as the authentication token and all available datasets). Additionally, there is a sub-store (called “modules” in vuex) for all data that needs to be shared among components in the /main/compare route. This has the advantage that local data such as dataset selections for a given view do not need to be stored in the global store, which avoids clumsy naming of variables.
Interaction with back-end
All interactions with the back-end are done via API calls that are dispatched by axios. The axios instance is bound to Vue.prototype.$http so all Vue instances and components have access to the client without import.
The API-calls are defined as a mixin in frontend/src/mixins.js in apiMixin. All components that need interaction with the back-end receive the apiMixin. The apimixin has a convenience method for fetching and storing the authentication token called .fetchAndStoreToken and two more generic methods that allow to dispatch, get and post requests, .fetchData and .postData, respectively. These work by returning the promise the is returned by Axios-requests is there is no error in the call. The caller can then resolve the promise and receive the data. If there is an error, however, the user is redirected to the login page to get a new token.